Two Tips for Cleaning Up Your Manuscript

Once you know these, you can’t unknow them, and you will see them in all kinds of published theses and dissertations (including my own, oops!). 

Straight quotes look the same whether they open or close a quotation and are a holdover from the typewriter. Smart quotes are the curly quotation marks that indicate the opening or closing of a quotation.

Often, when we cut and paste quotes from the web or other sources, we can unwittingly bring the local formatting into our documents, causing straight quotes to show up where they shouldn’t.

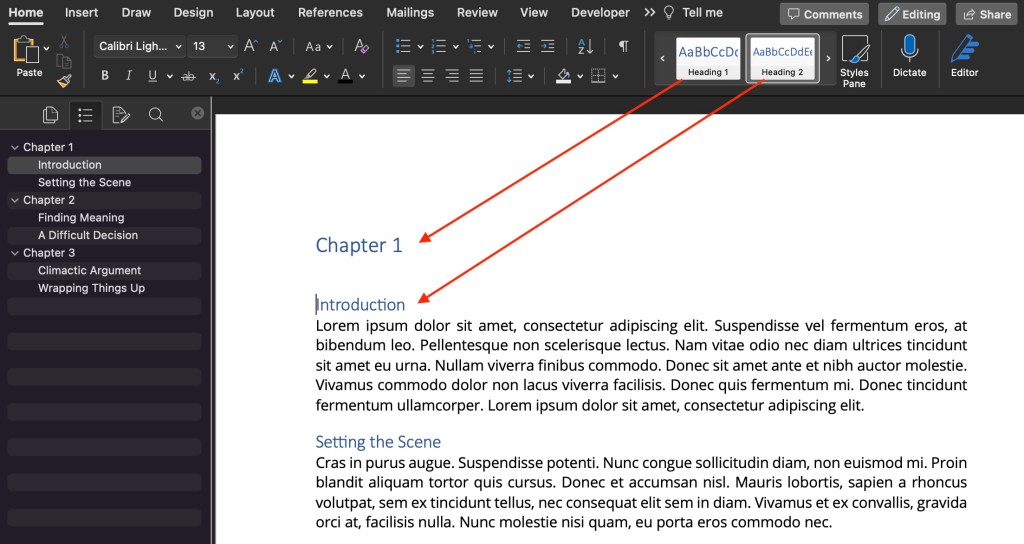
Fix: Find and Replace All

Word is set to automatically use smart quotes, so all you have to do is put a quotation mark into “Find” and a quotation mark into “Replace” and select “Replace All.”

Word will replace all the quotation marks with smart quotes whether they were originally straight or already smart.

You can do this with apostrophes as well. 

Can you spot the difference?

Commas following italicized titles, such as The Color Purple, should be consistent with the punctuation of the surrounding text (as it is here). 

It can be difficult to notice the difference between an italicized comma and a regular comma if you’re not looking for it, but now you’ll see this everywhere, and it will bug you. You’re welcome.

Fix: Advanced Find and Replace 

Under Advanced Find and Replace, type a comma in the “Find what” field. 

Then use the dropdown and select Format > Font > Font Style > Italics

Under the “Replace” tab, type a comma in the “Replace with” field. 

Then select Format > Font > Font Style > Regular

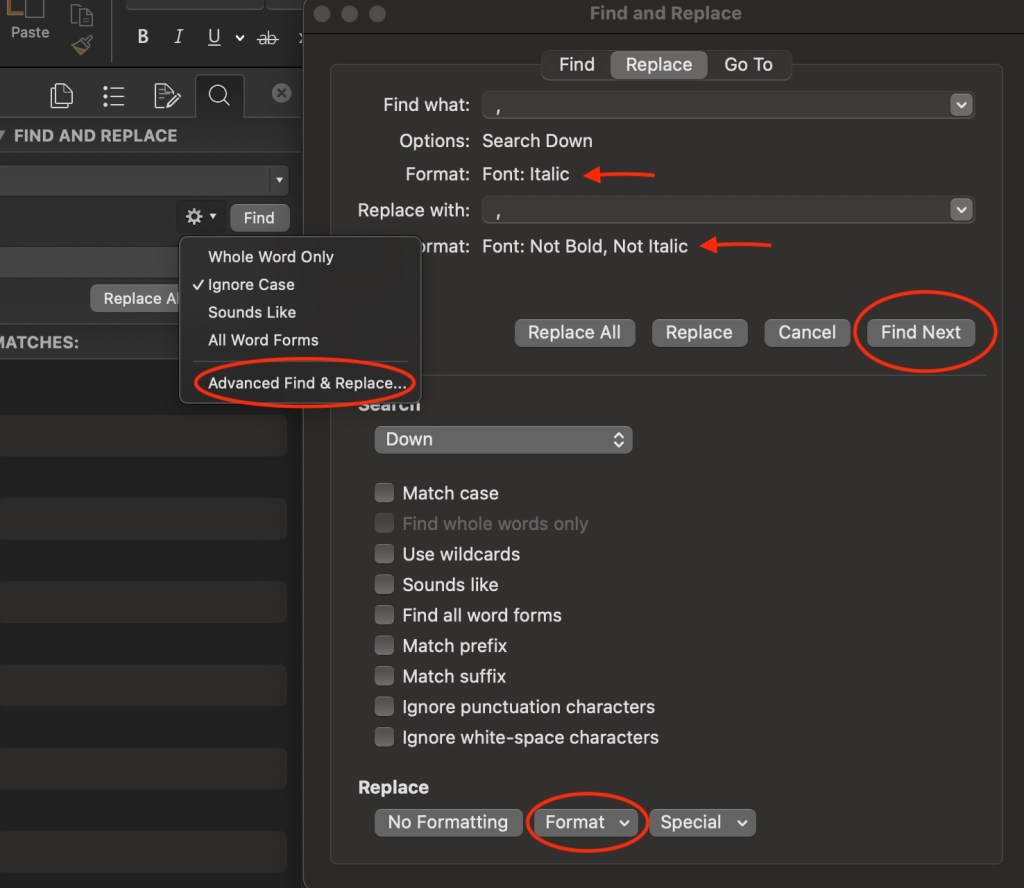
You can’t use “Replace All” for this fix. Rather, you will have to decide whether or not to replace each instance individually, because there may be cases where the italicized comma should remain, such as when the comma appears within a title or italicized passage.

If you have any trouble executing these tips, please let me know here!

Early in the Dissertation Process? Here Are Some Process Tips

These tips are geared toward technical and planning aspects of the dissertation process that can make your life easier by the time you’re getting ready to submit.

These are things I wish I knew—or did more consistently—when I was in the process of writing my dissertation.   

  • Download previously published dissertations from your department. You can usually find them on the university library website, the graduate studies website, or a dedicated university research repository website.
  • Take a look at a few examples and look for things like, How are they formatted? Where do they insert their figures? Do the ones with epilogues look interesting or would a proper conclusion suit your work better? What are their abstracts like? Who do they thank in their acknowledgements
  • It’s never too early to look at your university’s thesis formatting guidelines. What are your options when it comes to fonts and sizing? How should block quotes be indented? Should they be single- or double-spaced?
  • It can be a headache to go through and convert all the formatting at the end of the writing process, so it’s helpful to keep formatting in mind as you write.
  • Along these lines, pay attention to what happens to your formatting when you cut and paste content from other files or sources; the formatting is often imported along with the content. I’ve seen cases where line spacing or paragraph indents had to be checked and fixed paragraph-by-paragraph throughout the entire dissertation because, of course, if your block quotes are formatted differently than the rest of the document, you can’t simply select-all and apply a change to the entire document.
  • If you have an eye to formatting as you go, you’ll be smooth sailing at the finish line. 
  • Authors often use separate files to write their chapters. A benefit of using a single, long-form document is that you can more easily cut and paste and rearrange passages from one chapter to another. 
  • But it can be unwieldy to work with a long document if you’re not taking advantage of Word’s navigation pane—which allows you to create a clickable table of contents.
  • To learn how to create a long-form document that’s easy to navigate, click HERE
  • Make use of the “find” function to move around your document by searching keywords.
  • Fact: citations are frustrating. Reduce your pain by recording the full citation information of all your sources as you conduct your research, and by citing your sources as you write.
  • If you find yourself missing information from your citations, use google books, google scholar, or perplexity to find the missing parts. To find a page number, put a passage word-for-word in quotation marks into google.
  • When it comes to formatting your footnotes and bibliographic entries, the writing lab at Purdue University is an excellent resource.
  • When you’re researching in an archive, don’t forget to record the archive box and file numbers and titles. If you’re using your phone to take photos of archival items (with the archive’s permission of course), then also snap a photo of the file and the box information.
  • Use a scanning app on your phone to quickly create a PDFs.
  • And maintain a file naming convention for your PDF sources, as well as when you’re versioning your work. Your future self will thank your present one!
  • Writing is like a muscle. Many find it productive to keep that muscle strong by writing something—anything—every day.
  • Some write journal entries each day that may or may not have anything to do with their research, as per Joan Bolker’s wonderful advice.
  • Others keep a running file of their brainstorming. When I was writing my dissertation, I would often find myself sitting in front of my computer, thinking and thinking, trying to figure out what I wanted to say before I wrote it down. What I discovered was that it is much easier to figure out what I want to say when I free-write the thinking part. My free-writing might have sounded something like: “I don’t think this is an argument. Ok so then what would make it an argument? What if I connect this bit with the section in chapter 2…how would that change things?”
  • Both techniques take away the pressure to produce usable writing, and in the process, often end up producing usable writing!

If you have questions or wish there were a blog post that illuminated some other aspect of dissertation preparation, please let me know!

Dashes: Keyboard Shortcuts

An em dash is about the length of the letter M (—) , and an en dash is about the length of the letter N (–). That is all you need to know. Just kidding, but this tidbit certainly helps me keep them straight!

An em dash—one of my favourite forms of punctuation—can replace a comma, a colon, or surround parenthetical information. 

Shortcuts:

On a Mac: Option + the minus sign

On a PC: Control + the minus sign

An en dash represents the idea of “between ___ and ___.”

Example: The meeting will take place 9:00am – 11:00am.

Shortcuts:

On a Mac: Option + the minus sign

On a PC: Control + the minus sign

A hyphen is used in compound words (and, like the en dash, the hyphen can also represent a range, for example pages 4-9).

Example: book-length manuscript

But, use an en dash when a prefix applies to more than one word that follows it:

Example: post–World War Two

For a succinct and helpful guide on how to use these punctuation marks in your writing, see https://www.merriam-webster.com/grammar/em-dash-en-dash-how-to-use


Chicago’s Update on Ibid

In short, ibid is no more!

Have you ever moved a sentence from one place to another in your manuscript only to realize that doing so had reordered your footnotes and resulted in an ibid following the incorrect citation? And then you had to go back and figure out which citation the ibid originally followed? Headaches!!

This is why I’m so happy that in its 17th Edition of the Chicago Manual of Style (CMOS), Chicago recommends doing away with ibid.

Chicago cites that in electronic formats that link to single footnotes, ibid can confuse the reader . 

Notice that in entries that cite the last item cited, the entry is further abbreviated; the title is not included (no. 1–3). The page number, however, is always included, even if the page number is the same (no. 2–3).

Also notice that when an entry reappears later in the notes, the fuller version of the shortened entry is used (no. 5 and 8).

No longer is it required to include the full citation in the first entry in your footnotes, as long as you have a bibliography. 

So when your manuscript has a bibliography, you can use shortened notes exclusively. Yay!

It can be helpful for the reader, however, to have the full citation at their fingertips, which is why many publishers continue to use full citations in their first instance. But it’s nice to have options.

Restarting Footnotes in a New Chapter in Word

Chapter 3 should not start with footnote 38!

Footnotes should begin at 1 in each new chapter. Without section breaks, your footnotes will continuously count upward across the entire document.

How do you get footnotes to restart in a new chapter?

  • Put your cursor at the start of the chapter
  • In the Menu Bar, click Insert > Break > Section Break (Continuous)

Nothing will happen yet, but know that there is an invisible section break there. Repeat these steps for all chapters.

Next, set the footnotes formatting:

  • Click Insert > Footnote (don’t worry, you’re not actually going to insert a footnote)
  • Under Numbering, select Restart each section
  • Under Apply changes to, select Whole document
  • Click Apply

That’s it!


Make A Table of Contents in Word

This post is for those of you who think to yourselves, “I know there’s a way to make a table of contents in Word, but I don’t have time to learn that right now.”

Making a Table of Contents takes way less time than you think.

Once you have assigned heading styles to your chapters and subheadings, you can create a Table of Contents in three clicks.

  • Assign headings to your chapters and subtitles (learn how HERE).
  • Click References > Table of Contents
  • Choose a Style (I chose Classic)

Here is what my Table of Contents looked like with Word’s default style settings:

You can change the fonts, font size, style, and colour using your usual font tools under the HOME tab in your Main Menu:

Done!

*** If you change anything in your document that should be reflected in the Table of Contents, you must update it manually. Double-click the Table of Contents in your document, and under the drop-down menu, choose Update Table…


Using Headings in Word to Navigate Your Manuscript as You Write

Do you find yourself scrolling up and down long manuscripts, struggling to locate sections? 

Or perhaps you’ve saved your chapters as separate documents that you must continually open and close, minimize and maximize, or search for behind other windows.

In a few simple steps, you can streamline your work process for your long-form documents.

Using the Headings feature in Word will allow you, and anyone else, to move around your document with ease. 

(And once you have headings and subheadings set up, when your manuscript is complete, you can create a table of contents in a matter of a few clicks.)

  • Highlight your chapter title
  • Click the Home tab in the Main Menu
  • In the Styles window, click the side arrows until you find Heading 1 and select it (All your headings options might already be visible if your working window is expanded fully)
  • Repeat with each of your chapters

Once you’ve assigned a headings style to each of your chapters, you can use the Navigation Pane to navigate around your document.

  • Click the View tab in your Main Menu
  • Check the box for Navigation Pane
  • Inside the Navigation Pane, click the Document Map tab

  • Home tab > Styles window > choose Heading 2
  • Repeat with each of your subheadings

You will thank yourself, and so will your editor!

To change the way your headings look (font / font size / font colour), click HERE

Now that you have smart headings, Word can automatically populate a Table of Contents for your document in a matter of clicks. To learn how, click HERE